Configuring
Dicoogle often needs to be configured manually to fulfill certain needs. There are also a few features that may not work as intended without proper configuration. This page will skim through the configurable parts of Dicoogle.
Configuring the Indexers
Start by navigating to the Dicoogle web app and entering the Management menu. The first section of this menu is for indexer settings. It is also possible to enable the Dicoogle Directory Watcher, which creates a daemon that listens for new files in a directory and indexes them automatically. This is often useful when dragging files to the folder manually, but not when using Dicoogle as a DICOM server.
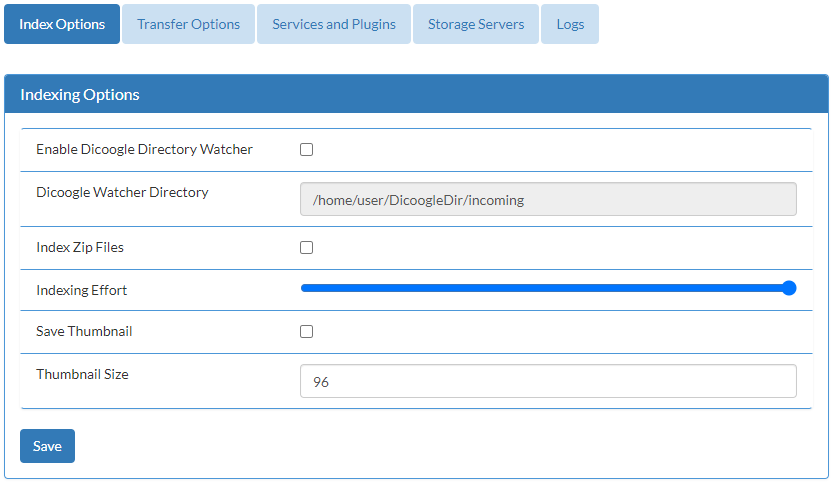
After selecting the configurations, the “Apply Settings” button must be pressed.
Transfer Options
As Dicoogle is a working DICOM server, it can also be configured to implement certain Service-Object Pair (SOP) classes. DICOM transfer options can be defined here by checking or unchecking transfer syntaxes from the list. The “Select All” button will enable all transfer syntaxes for all SOP classes. Pressing it again will perform the opposite.
![]()
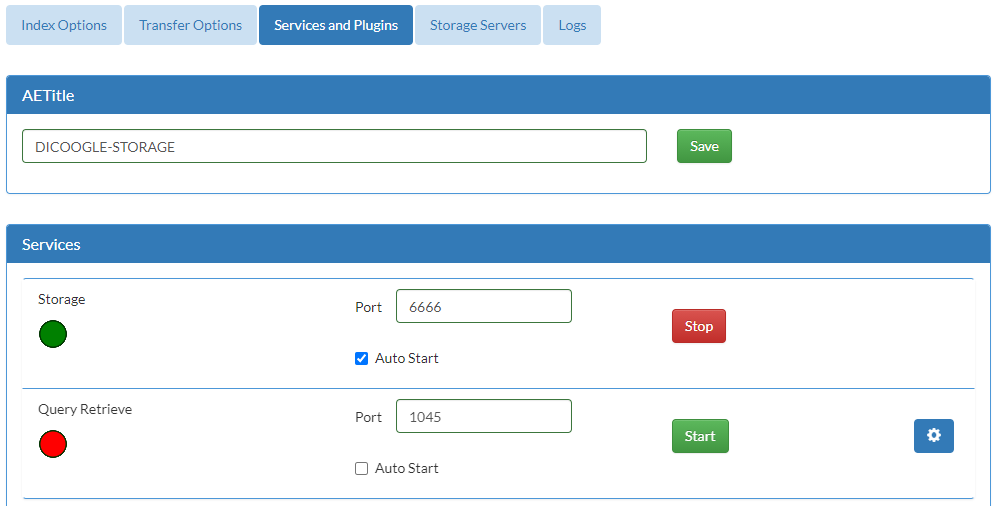
Configuring Services
In the Management menu, Services and Plugins tab, it is possible to start and/or stop currently running services in real time. Moreover, some configurations like the DICOM service ports may be redefined.
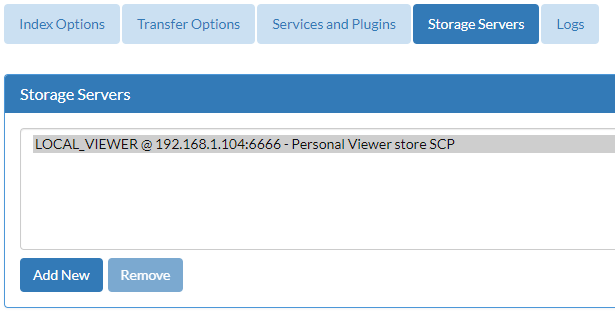
Configuring Storage Servers
In the Storage Servers tab, the administrator can record the known list of DICOM storage services. These are also called move destinations: Dicoogle will only admit C-MOVE operations towards these endpoints.
Configuration file
All configurations previously mentioned are stored in a single XML file.
Once Dicoogle is run at least once, you will find a file named “server.xml” in the configuration folder confs.
Eventually, there may still be a few configurations which can only be changed by editing this file.
The server needs to be restarted after any modifications to this file.
Migrating settings from Dicoogle 2 to Dicoogle 3
The structure of the server settings file config.xml has changed in Dicoogle 3. The instructions above refer to this new format. When migrating an existing installation, Dicoogle will automatically try to migrate the old settings file config.xml into the new one in confs/server.xml.
Take extra care when modifying configuration files by hand!
An incorrect configuration may prevent Dicoogle from running entirely. Consider backing up this file before modifying it. In order to revert all changes to the defaults, simply delete the file and let Dicoogle generate it again.
Configuring Plugins
Plugins can have settings of their own as well. Unlike the settings presented so far, these are kept in their own xml file, in a “settings” folder in “Plugins”, alongside the plugin jar files. This folder is automatically created, and plugins should automatically generate default configurations there. When configuring a plugin, one should attend to that plugin’s documentation.
As an example, the file storage allows the administrator to define a root path where incoming files are stored. Let’s modify this property to point to our storage directory. In “DicoogleDir/Plugins/settings”, assuming Dicoogle was run at least once, you will find a file named “file-storage.xml”. Look for the root-dir element:
<root-dir>/tmp</root-dir>
And change it to our storage:
<root-dir>/path/to/DicoogleDir/storage</root-dir>
As usual, the server needs to be restarted. Now the DICOM storage server can be safely enabled, and incoming C-STORE operations will save DICOM objects in it, organized as a directory tree.
Adding and removing users
Although Dicoogle does not provide a UI for the managing of the system users, it provides a web service endpoint for creation of new users and removal of existent ones.
Create user
To create a new user in the system, one can perform an HTTP request to /user with username and password query string parameters. Example:
curl -X POST "http://localhost:8080/user?username=johndoe&password=secret"
Alternatively, one may create an administrator user by adding the flag admin set to true:
curl -X POST "http://localhost:8080/user?username=johndoe&password=secret&admin=true"
Remove user
The removal of the user is executed with the HTTP method DELETE and the parameters are passed as path query to the same endpoint ( /users ). Example:
curl -X DELETE "http://localhost:8080/user/johndoe"
Breaking changes in Dicoogle 3
Some APIs may have changed starting from Dicoogle 3.0.0. For instance, creating new users was done with the PUT method instead of POST. Be sure to update all integration software when migrating.Connecting Dicoogle to a viewer
Next is a tutorial on how to interface Dicoogle with the open-source DICOM viewer Weasis. Any DICOM viewer supporting DICOM Query/Retrieve DIMSE services can be used in a similar way.
- If not already installed, download and install Weasis. The examples that follow are for version 4.5.1.
- Open Weasis and navigate to the Preferences menu.
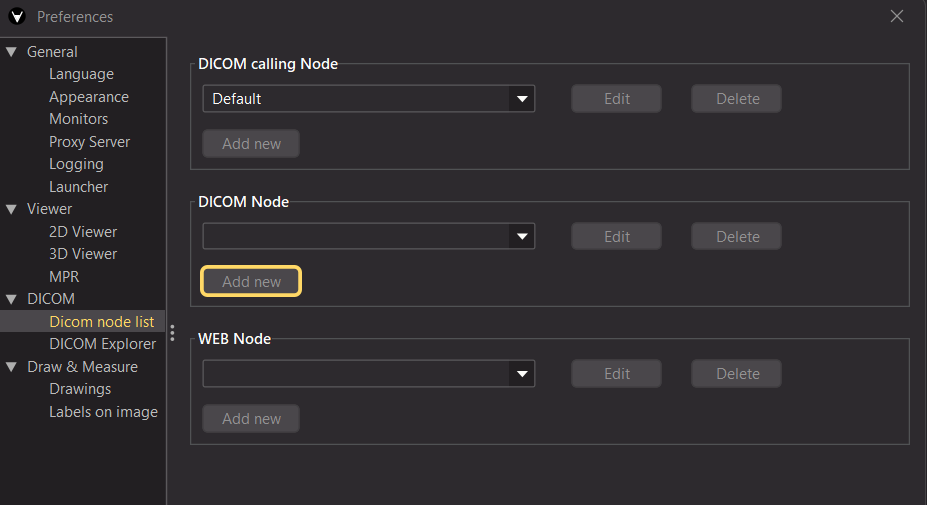
- In the DICOM Network tab, add a new DICOM Node. Insert the correct AE title of your Dicoogle instance here. This is
DICOOGLE-STORAGEby default. The hostname should be the same as the Dicoogle server, so it islocalhostor127.0.0.1if it is installed in your own machine. For the port, insert the Query/Retrieve service port, which is 1045 by default. For usage type, select Retrieve.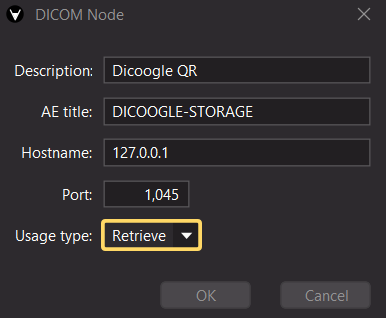
- We can also add a dedicated DICOM calling node. This will be called by Dicoogle for the transfer of imaging data. Choose an AE title for the Weasis SCP. In this example we went for
WEASIS. Input the listening hostname depending on the topology of your PACS: if both Weasis and Dicoogle are on your machine, use “localhost” or127.0.0.1. If they are in separate machines, bind the hostname to the common network (e.g.192.168.0.0, or0.0.0.0if you are sure that the network is secure). Then choose a port available on your workstation. For this example, we will pick 12221. For usage type, select Retrieve.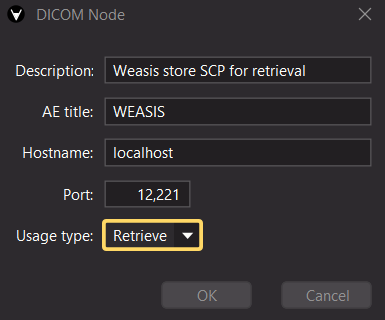
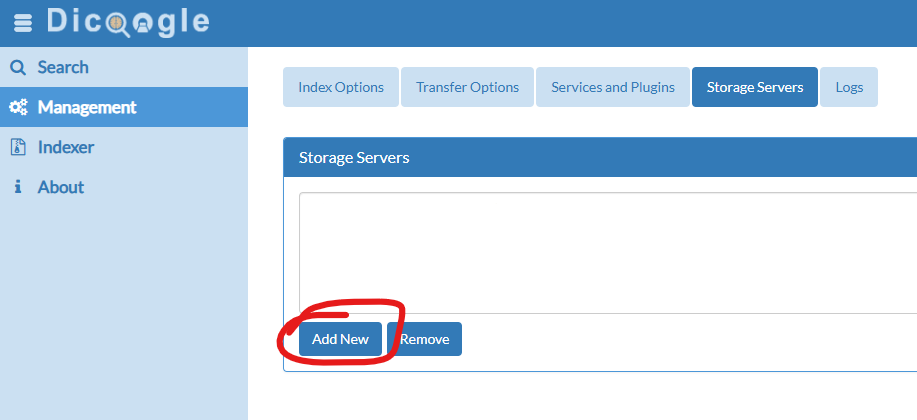
- Now we head to the Dicoogle Management menu, and enter Storage Servers. Press Add New.
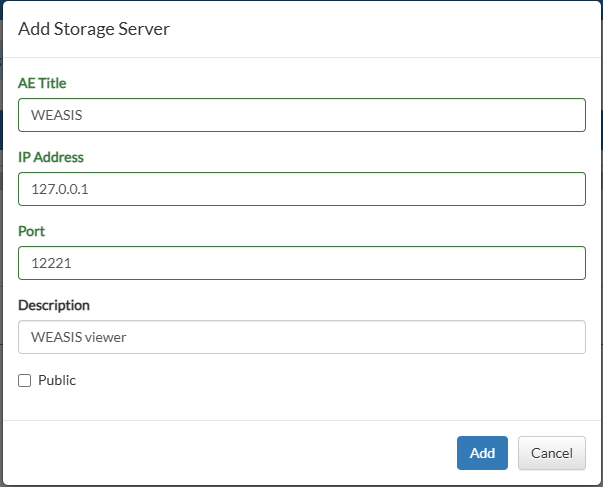
- In the new modal, insert the same AE title and service port chosen in step 4. The hostname should be the address of the workstation containing Weasis. Press Add.
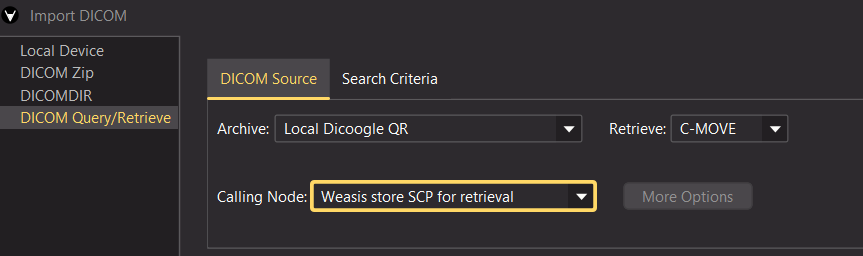
- Finally, we can test that everything is in order by searching for a study via Weasis. Press the DICOM import button.
 , and select the configured DICOM query node and DICOM calling node.
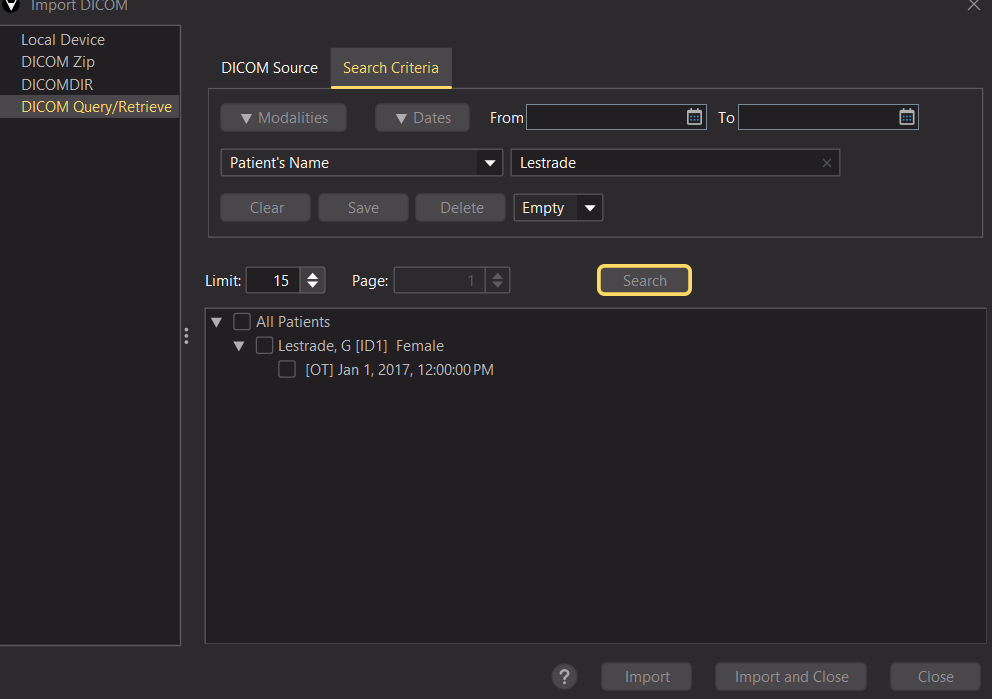
- If everything is correctly configured, the queried studies should appear on the list. Select each study to import and press the Import button to work with them in Weasis.
If the last step of importing the DICOM data fails, double check that the calling node is correctly confiured in Weasis, and that the storage server is correctly configured in Dicoogle.
For more information, see also the Weasis tutorial on importing DICOM data via Query/Retrieve.
This concludes the first chapter, where we have covered how to install Dicoogle in a machine, configure it, and use it for basic purposes. The next chapter is intended for developers wishing to further leverage the capabilities of Dicoogle using plugins.